
Vitrified Tiles Manufacturing Process: Step-by-Step Guide
In This Article
Vitrified tiles are low-porosity ceramic tiles made from clay, feldspar, quartz or silica-based materials, and other mineral additives. During firing at around 1,200°C, feldspar forms a glassy phase that helps make the tile dense and reduces water absorption (0.5%).
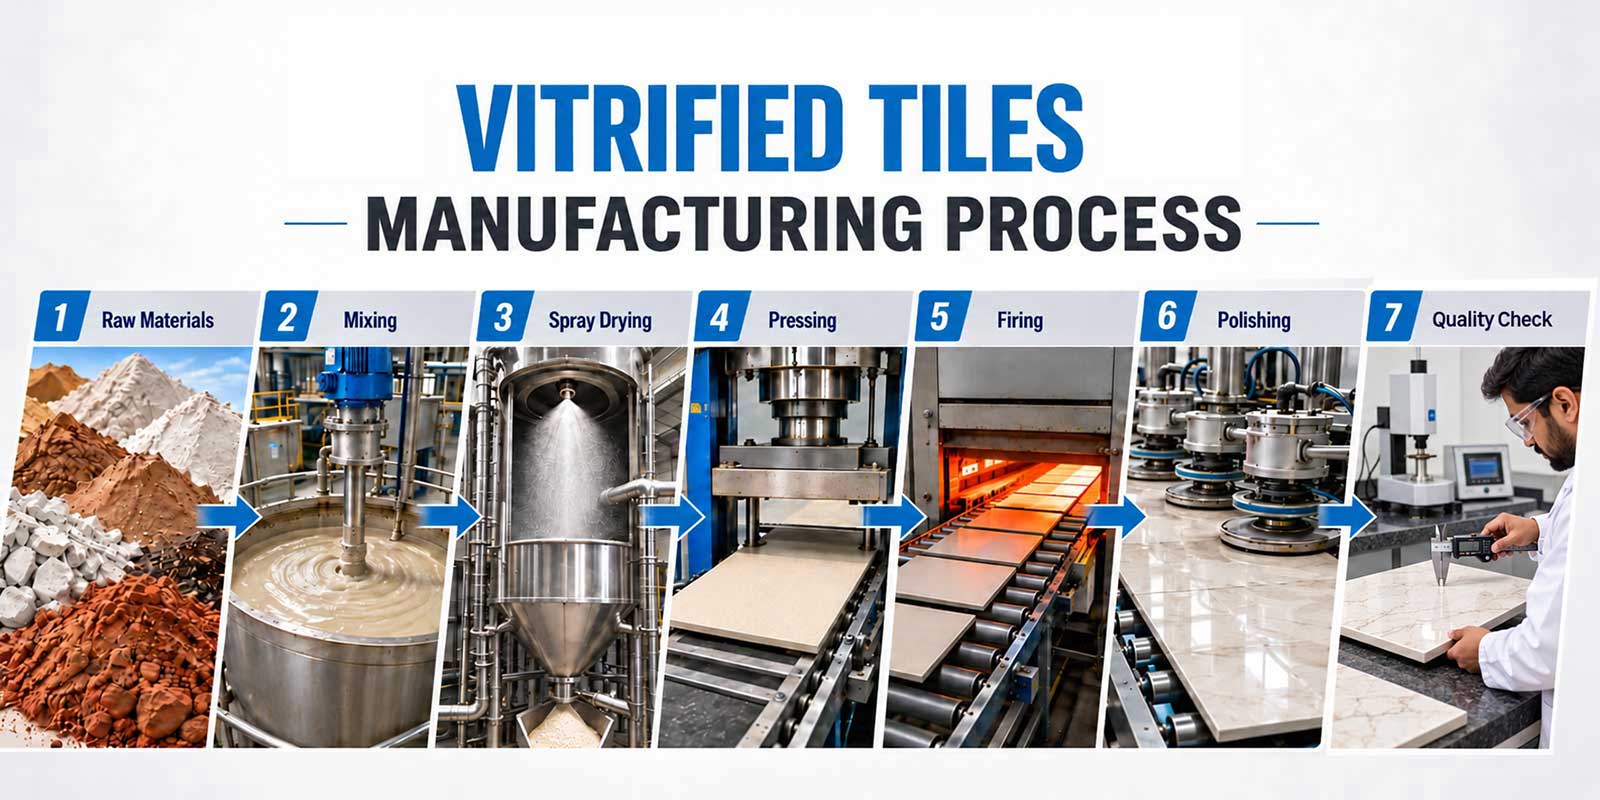
The manufacturing process includes several stages, from raw material batching to sorting of tile by shade and size.
This guide will help you understand each stage in order, explain what these tiles are made of, and show how the process changes for full body, double charge, glazed (GVT), and soluble salt tiles.
Key Takeaways
- Vitrified tiles are made in 10 main stages, from preparing raw materials to pressing, firing, finishing and sorting.
- Feldspar helps make the tile dense and less porous during firing.
- Full body, double charge, glazed (GVT/PGVT), and soluble salt tiles share the basic body-preparation process but differ in how and where their colour or design is introduced.
- IS 15622:2017 classifies tiles based on water absorption. BIa tiles have water absorption of up to 0.5% and are generally associated with vitrified tiles.
- Rectification and shade sorting help maintain consistent tile size and appearance. Small variations after firing do not necessarily mean there is a manufacturing defect.
What Is the Vitrified Tiles Manufacturing Process?
The vitrified tile manufacturing process involves several stages that turn raw mineral materials into dense, low-porosity tiles. It starts with weighing and preparing the raw materials and ends with finishing, inspection, and packing. The exact process can vary slightly depending on the tile type and manufacturer.
Firing is one of the most important stages of the process. Before firing, the raw materials are prepared, ground to the required particle size, and pressed into the required tile shape. During firing, high temperatures help form a glass-like phase within the tile body. This makes the tile denser and reduces its water absorption. After firing, the tiles are finished, sized, inspected, and packed.
The term “vitrified” is mainly used as a market term rather than as a formal classification name in the standards. In India, IS 15622:2017 and ISO 13006 classify pressed ceramic tiles into groups based on water absorption. Group B1a, with water absorption of 0.5% or less, is commonly sold in the Indian market as vitrified tile. The standards classify tiles based on their properties rather than simply using the trade term “vitrified.”
Process at a glance
| Stage | What Happens | Typical Parameter |
| 1. Batching and Weighing | Raw materials are weighed according to the required recipe. | — |
| 2. Wet Ball Milling | Materials are mixed and ground with water to form a slip. | Controlled particle size |
| 3. Spray Drying | The slip is converted into free-flowing granules. | ~5–7% moisture |
| 4. Hydraulic Pressing | Granules are pressed into the required tile shape. | Controlled pressure |
| 5. Green Tile Drying | Remaining moisture is removed before firing. | Below ~1% moisture |
| 6. Surface Application | Engobe, glaze, or digital printing is applied where required. | — |
| 7. Kiln Firing | Tiles are fired in a roller kiln, developing density and vitrification. | ~1,180–1,220°C peak |
| 8. Polishing / Finishing | The fired surface is polished or finished as required. | — |
| 9. Squaring and Rectification | Edges are trimmed, and tiles are ground to precise dimensions. | — |
| 10. Sorting and Packing | Finished tiles are checked and sorted by shade, size and quality before packing. | — |
What Are Vitrified Tiles Made Of?
Vitrified tiles are made using a mixture of clay, feldspar, quartz, and silica sand. These materials are mixed with water and ground into a fine slip. The slip is then spray-dried into granules, which are pressed into the required tile shape.
Each raw material has a specific role in the tile body. The right balance of these materials helps the tile become dense, strong, and low in water absorption during firing. These properties are what make vitrified tiles different from ordinary ceramic tiles.
Why Feldspar Is the Ingredient That Makes a Tile Vitrified?
Feldspar plays a key role during firing because it acts as a flux. At high temperatures, it melts and forms a glassy phase that fills some of the spaces between the mineral particles in the tile body. As the tile cools, this glassy phase hardens, helping make the body denser and reducing its water absorption. The balance of feldspar and other raw materials, along with pressing and firing conditions, determines the final density and performance of the tile.
Where the Raw Materials Come From?
The main raw materials used in vitrified tiles are ball clay, china clay, feldspar, quartz, and silica sand. Most of these materials are sourced from mineral deposits in India.
Some materials may also be imported when a specific tile body requires higher whiteness, better plasticity, or more consistent quality. Clay used in production may be sourced from other countries, along with material from domestic mines.
The exact source of each material can vary depending on the manufacturer, plant, and type of tile being produced.
Raw Materials and Their Functions
| Material | Main Function | If There Is Not Enough |
| Ball clay | Provides plasticity and helps shape the wet body | Difficult to shape and handle |
| China clay (kaolin) | Improves whiteness and green strength | Weaker and less white body |
| Feldspar | Acts as a flux and helps form the glassy phase during firing | Higher porosity and water absorption |
| Quartz / silica | Provides rigidity and helps control shrinkage | Greater risk of warping and uneven shrinkage |
| Talc or dolomite | Helps control firing behaviour and shrinkage | Less consistent firing results |
| Pigments and stains | Provide colour and decorative effects | Uneven or incorrect colour |
| Water and deflocculant | Help form and control the flow of the slip during milling | Poor milling and slip flow |
Vitrified tiles are made from ball clay and china clay, which provide plasticity and green strength. Feldspar acts as a flux and forms a glassy phase during firing. Quartz and silica add rigidity and help maintain dimensional stability.
Small amounts of talc or dolomite may be added to control firing behaviour, while mineral pigments provide colour. Water and a deflocculant help carry the raw materials through the wet milling process.
How Vitrified Tiles Are Made: The 10 Production Stages
Vitrified tiles go through ten main stages, starting with raw material preparation and ending with sorting and packing. The materials are first milled and prepared for pressing. The pressed tile is then dried, given the required surface treatment, fired, finished, rectified, and checked before it is packed.
-
Raw Material Batching and Weighing
The process starts by weighing clay, feldspar, quartz, and other additives according to the required recipe. Keeping the quantities consistent helps maintain the same body composition from one batch to another. This is important for getting consistent strength, colour and dimensions in the finished tiles.
-
Wet Ball Milling
The raw materials are mixed with water and a small amount of deflocculant and ground in a ball mill. This creates a fine suspension called slip. The particle size and residue are controlled at this stage because they affect the quality and consistency of the tile body.
-
Spray Drying
The slip is sent into a spray dryer, where it is broken into small droplets and dried with hot air. The water evaporates and leaves behind free-flowing granules with around 5–7% residual moisture. The right granule size and moisture level help the powder fill the press mould evenly.
-
Hydraulic Pressing
The dried granules are fed into a mould and pressed under high hydraulic pressure to form a green tile. The tile gets its shape at this stage, but it has not yet reached its final strength. Even compaction helps control its density, thickness, and shrinkage during firing.
-
Drying the Green Tile
The pressed tile still contains some moisture, so it is dried before going into the kiln. The moisture level is generally brought down to below 1%. Proper drying reduces the chance of cracks and other defects when the remaining moisture turns into steam during firing.
-
Surface Application
The surface treatment depends on the type of tile being made. Glazed tiles may receive engobe, glaze and digital printing before firing. In full-body and double-charge tiles, the design mainly comes from the tile body or decorative powder layer, so the surface treatment is different or may not be needed.
-
Kiln Firing and Vitrification
The green tile is fired in a roller kiln, with peak temperatures typically around 1,180–1,220°C for porcelain-type bodies. During firing, feldspar melts and forms a glassy phase in the tile body. This helps close the pores, making the tile denser and reducing water absorption. The tile is then cooled in a controlled manner to reduce thermal stress and cracking.
-
Polishing, Lapping and Surface Finishing
After firing, the tiles can be finished in different ways depending on the required appearance. These include polishing, lapping, matt finishing, carving and rustic finishing. Polishing can open very small pores on the surface, so a protective treatment may be applied to improve stain resistance and make cleaning easier.
-
Squaring and Rectification
Rectification means mechanically grinding the edges of fired tiles to make their dimensions more precise and uniform. Rectified tiles can therefore be installed with narrower and more consistent grout joints. Non-rectified tiles retain some variation from firing and generally need wider joints.
-
Sorting, Grading and Packing
The finished tiles are checked for size, surface quality, shade and other defects. They are then sorted into suitable shade and caliber groups before packing. The shade and caliber details on the box help buyers match tiles more easily when they are installed.
Stage-wise control parameters
| Stage | Parameters controlled | Why it matters |
| Spray drying | Residual moisture (~5–7%) | Helps the powder flow evenly into the press die |
| Hydraulic pressing | Compaction pressure | Controls green density and later shrinkage |
| Green drying | Residual moisture (<~1%) | Reduces the risk of steam-related cracking in the kiln |
| Kiln firing | Peak temperature (~1,180–1,220°C) | Drives vitrification and pore closure |
| Kiln firing | Cooling rate | Helps prevent thermal shock and crazing |
| Rectification | Edge dimension tolerance | Helps achieve consistent grout joints |
How the Process Changes for Each Type of Vitrified Tile?
Vitrified tile types share the same basic body-preparation process, but they differ in where and how the design or colour is introduced. Full body tiles have pigment incorporated into the tile body, double charge tiles receive a decorative powder layer during pressing, while GVT/PGVT and soluble salt tiles receive their surface decoration before firing.
Manufacturing route by tile type
| Tile Type | Design Source | Decorated | Glazed? | Finish |
| Full Body | Whole-body pigment | Before pressing | No | Polished |
| Double Charge | 3–4 mm powder layer | During pressing | No | Polished |
| Glazed (GVT) | Surface digital print | Before firing | Yes | Optional polish |
| Soluble Salt | Liquid metallic salt | Before firing | No | Polished |
Full Body Vitrified Tiles
In full body tiles, the pigment is mixed through the entire tile body before pressing. There is no separate decorative layer on the surface. Since the colour runs through the body, the surface can be ground or polished without removing the design completely.
Double Charge Vitrified Tiles
Double charge tiles are made using two powder layers in the press. A decorative layer, usually around 3–4 mm thick, is placed over the base body and pressed together in one cycle. No glaze is used. The design comes from the powder layer, so the type of pattern depends on how the powders are arranged.
Glazed Vitrified Tiles (GVT and PGVT)
A pressed tile body first receives treatments such as engobe and glaze, followed by digital inkjet printing and a protective glaze coat. PGVT, or polished glazed vitrified tile, follows the same process but is polished after firing. Since the design is printed on the surface, this process allows a wide range of patterns and finishes.
Soluble Salt Vitrified Tiles
In soluble salt tiles, a metallic salt solution is applied to the pressed tile body before firing. The solution penetrates a shallow portion of the surface, with the depth varying according to the formulation and manufacturing process. After firing, the surface is polished to reveal the resulting pattern.
What Actually Happens Inside the Kiln?
During firing, the feldspar in the tile body melts and forms a glassy phase. This glass moves into the spaces between the particles and helps close the pores. As the tile cools, the glass hardens, making the tile denser and keeping water absorption at 0.5% or less.
Why Fired Tiles Come Out Smaller Than They Went In?
As the tile is heated, the glass phase forms and the pores start to close. The particles move closer together, which reduces the tile’s size. This is known as firing shrinkage. It can be several percentage points for porcelain-type bodies, but the exact amount depends on the body composition, pressing density and firing conditions. That is why tiles are finished to their required size after firing instead of being pressed to the final size.
What Caliber and Shade Lot Codes on the Box Mean?
Tiles can shrink slightly differently during firing, even when they are made using the same recipe and kiln. After firing, they are therefore sorted into caliber groups based on their actual size and shade lots based on their colour. This is why it is important to use boxes from the same lot when possible. Rectification also helps bring fired tiles to a more consistent size.
Vitrified vs Ceramic Tiles: What Differs in Manufacturing
Vitrified and ceramic tiles follow the same basic manufacturing process, but their body composition and firing conditions are different. Vitrified tiles generally use more feldspar flux, higher compaction and higher firing temperatures. This produces a denser body with water absorption of 0.5% or less. Ceramic tiles are less vitrified and usually have higher water absorption.
| Parameter | Vitrified (BIa) | Ceramic |
| Body composition / flux content | Higher feldspar content | Lower feldspar content |
| Forming pressure | Higher compaction pressure | Lower compaction pressure |
| Firing temperature | Higher peak temperature | Lower peak temperature |
| Number of firings | Typically single-fired | Often single or double-fired |
| Water absorption group (IS 15622:2017) | BIa (≤0.5%) | Higher absorption groups |
| Result in the finished tile | Dense, low-porosity body | More porous body |
Abrasion resistance is not measured in the same way for all tiles. PEI abrasion classes apply to glazed surfaces, while unglazed and full-body tiles are assessed using deep abrasion resistance, measured by the volume of material removed in mm³.
How Vitrified Tiles Are Tested Before They Leave the Plant?
Vitrified tiles in India are covered by IS 15622:2017, which classifies pressed ceramic tiles according to water absorption. BIa covers tiles with water absorption of 0.5% or less. The IS 13630 series provides test methods for properties such as water absorption, breaking strength, abrasion resistance, dimensional quality, chemical resistance, and thermal shock.
Vitrified tiles in India are covered by the applicable BIS standards and certification requirements. IS 15622:2017 also aligns with ISO 13006, so the BIa/BIb classification used on Indian tiles follows the same classification system used internationally.
What is tested and why?
| Property | Method | BIa Rule | Meaning |
| Water absorption | IS 13630 series | ≤0.5% | Measures body porosity |
| Abrasion wear — glazed | PEI | Class | Measures surface wear resistance |
| Deep abrasion — unglazed | Deep abrasion (mm³) | Volume loss | Measures wear resistance |
| Breaking strength | IS 13630 series | Min. required | Measures load capacity |
| Dimensions | IS 13630 series | Inside tolerances | Measures size and flatness |
| Chemical resistance | IS 13630 series | Pass by class | Measures stain/acid defense |
| Thermal shock | IS 13630 series | Pass/fail | Measures temperature defense |
What the Manufacturing Process Means for the Tile You Buy?
The manufacturing process gives you a few simple things to check when buying vitrified tiles.
- Check the water absorption group on the box or datasheet. BIa means the tile has water absorption of 0.5% or less.
- Look for the BIS Standard Mark and licence number on the packaging.
- Check whether the tile is rectified or non-rectified, as this affects the grout joint width.
- Make sure the caliber and shade lot codes match across all the boxes in your order. Different codes can lead to visible differences in size or colour.
- Check the tile type — full body, double charge, GVT or soluble salt — to understand how the design is made and how deep it goes into the tile.
- Check the thickness in mm and make sure it is suitable for the intended application.
- Check the abrasion rating on the correct basis. PEI is used for glazed tiles, while unglazed tiles are assessed using deep abrasion in mm³.
- Try to order the required quantity from the same batch or lot, along with some extra tiles for wastage. This helps avoid having to use a different shade lot later.
How Aparna Enterprises Manufactures Vitrified Tiles?
Aparna Enterprises manufactures vitrified tiles at its Kakinada and Morbi facilities. Its production includes full body, double charge, glazed vitrified (GVT/PGVT), and soluble salt tiles. The basic manufacturing process remains the same, while the surface treatment and finishing vary depending on the tile type.
The process includes controlled batching, wet milling, monitored firing, rectification, and shade-lot sorting. These steps are followed across the vitrified tile range in line with IS 15622:2017 and applicable BIS certification requirements.
Frequently Asked Questions
Vitrified tiles are made by mixing and grinding clay, feldspar, quartz, and silica with water to form a slip. The slip is spray-dried into granules, pressed into shape, and fired at around 1,200°C. During firing, feldspar forms a glassy phase that makes the tile dense and keeps water absorption low.
Vitrified tiles are mainly made from clay, feldspar, quartz, and silica sand. Small amounts of talc or dolomite and mineral pigments may also be added. Feldspar acts as a flux during firing and helps form the glassy phase that makes the tile dense.
Vitrified tiles are generally fired at around 1,180–1,220°C for a porcelain-type body. The exact temperature can vary depending on the body composition, kiln, and firing cycle used by the manufacturer.
There is no fixed time for every vitrified tile. The process includes milling, spray drying, pressing, drying, firing, finishing, and rectification. The total time can vary depending on the plant, tile size, finish, and the firing and drying process used.
Most modern vitrified tiles are single-fired, which means the tile body and any required surface treatment go through the kiln in one firing cycle. Some specialised or older manufacturing processes may involve a second firing, but single firing is common today.
No. Vitrified tiles are not completely waterproof, but they have very low water absorption and are highly water-resistant. BIa-classified tiles absorb 0.5% or less water by weight. This makes them suitable for many flooring and wall applications, but it does not mean they have zero water absorption.
Tiles shrink slightly during firing, and the amount of shrinkage can vary from one production run to another. Because of this, finished tiles are sorted into caliber groups based on their actual size. It is also important to check the caliber code on the boxes when buying tiles for the same floor.
Largely, yes. Under ISO 13006, porcelain and vitrified tiles fall under the same low-water-absorption group. Porcelain is the term more commonly used internationally, while vitrified is widely used in the Indian market.
Both types are available. Glazed vitrified tiles (GVT/PGVT) have a printed and glazed surface, while full body, double charge, and soluble salt vitrified tiles do not use a glazed surface for their design. Their appearance comes from the tile body or the decorative layer used during manufacturing.
IS 15622:2017 is the applicable Indian standard. It classifies pressed ceramic tiles based on water absorption, with BIa covering tiles with water absorption of 0.5% or less. The standard is aligned with the international ISO 13006 classification system.
Start Your Project with the Right Materials
We provide everything you need for modern construction. Connect with our experts to discuss your requirements and get the best solution for your project. Submit your details and our team will contact you soon.
CORPORATE OFFICE
8-2-293/82/A, Plot No-1214, Road No-60,
Jubilee Hills, Hyderabad-500 033.